 Harmonica Cheatsheet
Chord tones on diatonic harmonica
Chord tones are the notes the chord under you is built from: root, third, fifth, and usually a seventh. That is not the same as the notes of the scale. A scale tells you what fits the tune; the chord tells you what fits this bar. Knowing where the chord tones sit is the difference between a line that lands and one that merely avoids wrong notes.
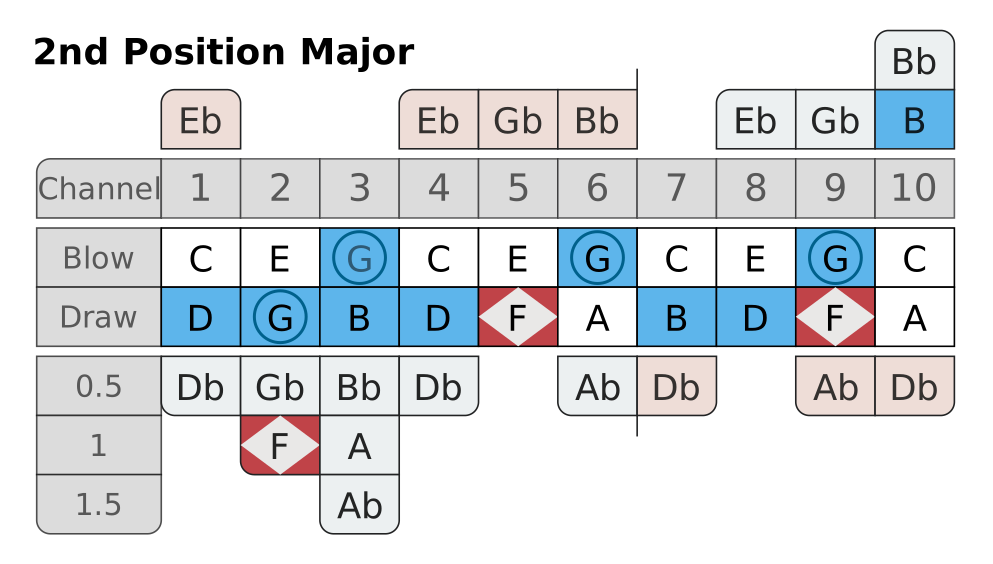
What the diagram is telling you
- The root has a ring. G appears on draw 2, blow 3, blow 6 and blow 9. It is the most stable note over this chord and the least interesting one to sit on.
- The third and the seventh are the ones that matter. B on draw 3 and draw 7, F on draw 5 and draw 9. Between them they say “dominant seventh”. Take away the root and the fifth and a listener still knows what the chord is; take away the third and seventh and they do not.
- The fifth is nearly furniture. D on draw 1, 4 and 8 fits, but it adds almost no information — the fifth is the same in a major, a minor and a dominant chord.
- And the two that matter sit close together. B is draw 3, F is draw 5 — two holes apart, both on the draw. That is a big part of why second position works.
Scale tone, chord tone, target tone, passing tone
Four words people use as if they meant the same thing. They do not.
| Term | What it means | Example in second position |
|---|---|---|
| Scale tone | Belongs to the scale of the tune | C on blow 4 belongs to G Mixolydian |
| Chord tone | Belongs to the chord sounding right now | Over G7, C is not one — it is a fourth above the root |
| Target tone | A chord tone you deliberately arrive on, usually on a strong beat | Landing on draw 5 (F) as the bar turns over |
| Passing tone | A note you go through rather than stop on | Blow 4 (C) between draw 3 (B) and draw 4 (D) |
So a note can be perfectly in key and still be a bad place to stop. Hold C over a G7 and it just hangs there — the ear wants it to drop to B. Fine if you meant it.
Nothing on the diagram is forbidden. Chromatic approach notes, blue notes and deliberate tensions are half of what makes harmonica playing sound like harmonica playing. The map tells you what each note is doing over the current chord. What you do with that is a musical decision, not a rule.
Guide tones: two notes per chord is enough
The third and the seventh are called the guide tones. Play just those two from each chord, one after the other, and people hear the whole progression — even with nobody backing you up. It is the shortest way into playing changes, and it is worth watching on a real one.
The three chords of a blues
A twelve-bar blues is built from the I, the IV and the V. On a C harmonica in second position they are G7, C7 and D7. The G7 above is the I — more than half the form sits there, and every note of it is a plain blow or draw.
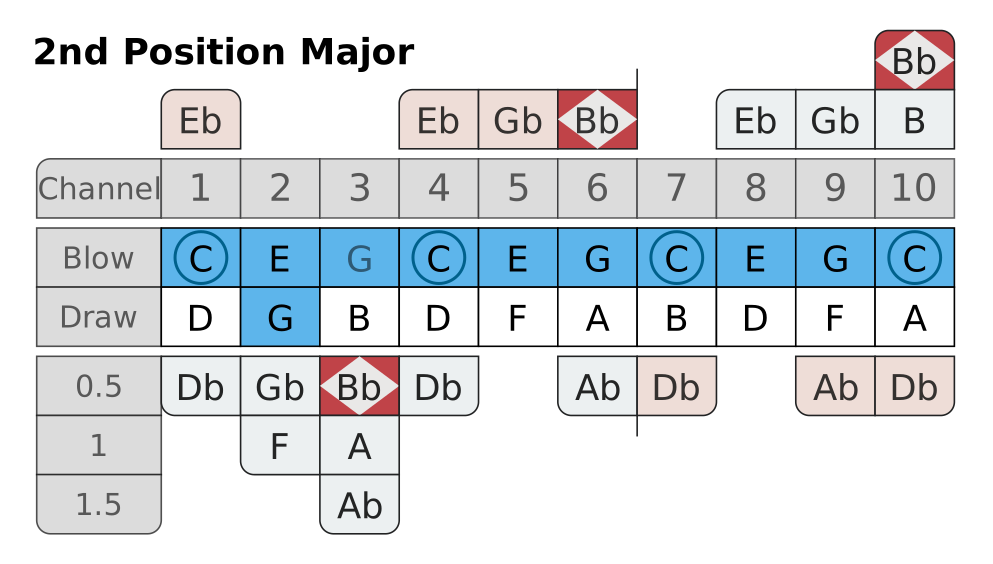
Bar 5, and the chord moves to the other breath. Count the plain notes each one gives you: over the I, eight are draw notes and three are blow notes. Over the IV it is ten blow notes and a single draw note.
Two notes carry the change
Put the two maps next to each other and the difference is smaller than it looks. G is in both chords and never has to move. Of the rest, the third and the seventh do the real work: move only those two and a listener still hears the change.
| Over the I (G7) | Over the IV (C7) | What you physically do |
|---|---|---|
| B — draw 3 | Bb — draw 3, bent a half step | Same hole, same breath, bend a semitone |
| F — draw 5 | E — blow 5 | Same hole, change the breath |
| D — draw 4 | C — blow 4 | Same hole, change the breath |
| G — draw 2, blow 3, 6, 9 | G — unchanged | Nothing |
Three of the four moves happen without leaving the hole you are already in. The instrument was not designed for this music; the layout happens to put the I and the IV a breath apart.
The one that needs care is draw 3 bent a half step. Draw 3 is the hole with three separate bends on a Richter harp, so a half step is easy to overshoot. If your IV chord sounds sour, that note is the first place to look.
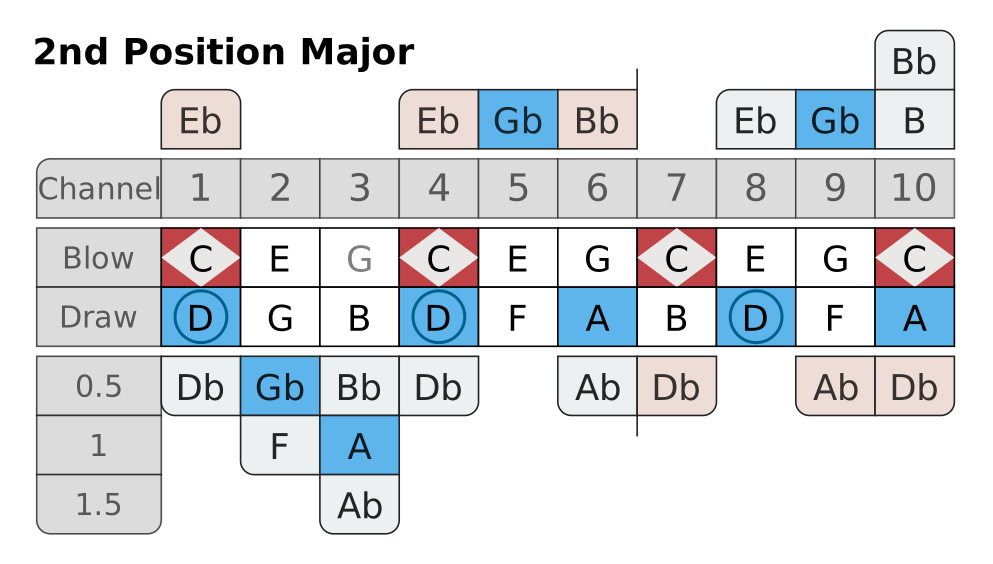
Bar 9 is the one place in the form where the harmonica is genuinely short of material. Blow and draw notes split almost evenly — four against five — so neither breath direction carries the chord on its own. And that missing F# is the major third of the V chord, one of the most ordinary notes in Western music, which the harmonica will not simply hand over. Every way to get it is a technique:
- Draw 2, bent a half step. The usual answer, and the reason draw 2 bends get so much attention.
- Blow bend on hole 9. Awkward, but it puts the note up high, where a solo often wants it anyway.
- Overblow on hole 5. Reliable once you can do it, and needs a well-adjusted harmonica.
- Leave it out. Play D, A and C and let the band supply the third. Most players do exactly this, and it sounds fine as long as someone else is holding the harmony.
Practice: the whole form on six notes
- Put on a slow shuffle in G. Over the I, play only draw 3 and draw 5. One note per bar, four bars. Listen to how little you need.
- At bar 5, the IV: draw 3 bent a half step and blow 5. Two bars. Two small movements carry the whole change.
- Bars 7 and 8 are the I again: release the bend, back to draw 5.
- Bar 9, the V: draw 2 bent a half step and blow 4. If that bend is not clean yet, use draw 1 and blow 4 and come back to it.
- Bar 10 is the IV again, bars 11 and 12 the I. Five times through, then just play. You will hear the chord move even when you are not on its notes.
A common misconception
“If I stay in the blues scale I cannot go wrong.” You can play the blues scale for twelve bars and never once acknowledge that the chord changed. A lot of great playing does exactly that. But it only counts as a choice if you could also do otherwise — and the moment you meet the IV with its own third, the same scale starts sounding deliberate.
The opposite mistake is just as common: outlining every chord so faithfully that the solo turns into an arpeggio exercise. Chord tones are where you land, not where you live.
The same thing on any harmonica
None of this is specific to a C harp. On an A harp in second position the chords are E7, A7 and B7 — the third of the I is still draw 3, the seventh of the IV is still the half-step bend of draw 3. Change key and the note names change while every hole number stays where it is. That is why it is worth learning as scale degrees rather than note names.